Showing posts with label design. Show all posts

Friday, January 4, 2013

This just got real.

This morning, Matt and I stopped by Roth Green Energy to firm up some details about the geothermal and solar PV systems they quoted us, as well as put in down payments to lock in our contracts. We were greeted by coffee and donuts (they got them just for us!) and enjoyed another really great meeting. In a previous post about estimates I promised to go into more detail about the quotes we received, which I can follow through with now that we've locked in their services.

Geothermal
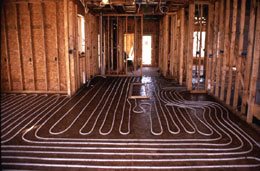
Considering the planned size of our house, it was determined both by us as well as independently by the folks at Roth that a 2-ton system would suffice. Not only will the system supply heat for our house, but it will also supply domestic hot water (DHW). After some thought, we decided to go with the in-slab heating due to its efficiency, quietness, even heating, and the fact that we won't have to spend the time and money to construct a subfloor as originally planned with the baseboard heaters. Below is the scope of the project:
So, the bottom line: Total Geothermal $33,810.97
We put down a 30% down payment today of $10,143.29(!), which is the same amount we can expect to get back thanks to a 30% tax credit. So the total out of pocket is expected to be $23,667.68.

Solar
As far as solar panels are concerned, we figured: go big or go home. Since we are hoping to go net zero, we had to plan for a large PV array to cover all our energy consumption needs, which will be large since everything will be electric. We used a couple different approaches to project our total consumption, including estimating from my parents' electric bill (since we have similar habits, and their bill includes electric appliances and a well pump); estimating using our own current electric bill plus what we can expect from adding in electric appliances & a well pump; and using a worksheet provided by NYSERDA that included a breakdown by appliance. All three methods were surprisingly consistent with each other, and estimated a total usage of roughly 10,000 KWH/year. We also added in an additional 2,000 KWH/yr for an anticipated electric car (eventually). Roth Green Energy came back with the following 12,480(!) watt grid-tied PV system, complete with all materials, engineering/submittals, software, programming, installation and wiring, system commissioning, start-up, check out, and owner training:
  • Supply and install 48 Solar World 260W mono panels, roof mounted on front roof - brand new & 100% made in the USA!
    • 2 strings of 12 panels
  • Provide 2 Sunny Boy 6000US STD inverters
  • Production meter
  • Monitoring Package
  • Solar mount roof racking system
  • Provide wire, conduit string combiner, system disconnect, and miscellaneous electrical components to complete the installation
There are all kinds of incentives for solar, including grants, rebates, and a tax credit:
                 Project Cost                       $45,000.00
                 NYSERDA Grant                 ($10,500.00)
                 Initial Costs                        $34,500.00
                 Federal tax credit (30%)    ($10,350.00)
                 NY State rebate                ($5,000.00)
                 Total out of pocket           $19,150.00

We were shocked to see that, thanks to so many incentives, the total out of pocket cost of such a huge PV array is under $20,000. We still recognize that it is a huge investment that will take many years to recoup the costs, but seriously: HOW COOL IS THAT??!? Some people spend money on cars, some people spend money on traveling... I'm happy to invest in solar photovoltaics. Anyways, it was important to put in a down payment today so that they could get started on the paperwork, since it can take months to get it all approved (and boy are we glad they're doing all the paper pushing for us!!). We put in a 35% down payment towards the total project cost, meaning $15,750,00.

Yikes, we wrote two huge checks today :-O ... That fact is still sinking in. These are just the first two of many that are sure to come (or go, I suppose is more accurate). It feels scary to part with so much so quickly, but we are really excited about what this money is going towards. We feel we'll be setting a really great example and are excited to be pioneers in really committing to green energy. We are very happy that we've chosen Roth Green Energy for our energy needs and feel confident they'll do a great job!


Updated budget:
Deposit for Geothermal: $10,143.29
Deposit for Solar: $15,750.00
Total spent so far: $27,703.29

Tuesday, November 13, 2012

How do we heat?

I have been looking into this a lot and so has our first choice for a GC, Al.  It seems we are set on a Geothermal heat-pump system that would provide heat to some sort of radiant heating system.


At this point in the selection of the best radiant system I have seen a lot of talk that the best way to use a geothermal heat-pump water system would be to use in floor radiant (http://www.advancedsolutions.ca/geothermal.html).
 The issues with this system at our current level of planning is that we have a one floor, no basement, concrete slab directly under the floor.  So one might say that it is an obvious choice to put radiant into the slab because it's the easiest way to go....but I don't buy that it is more efficient in this situation because I wonder just how much of that heat is going to be dumped *under* the house and just disappear forever.  So another solution to the in-floor problem is an idea that I just had, so it's a little rough.  We put down a "sub-floor" of 1"or 2" high-density polystyrene foam and then lay the in-floor radiant on top of that.  Maybe the foam could even be foil backed to reflect the most amount of radiant heat back into the home.

Another solution to the heating problem is to use baseboard heating.
 Again looking at the literature I have only seen comments against this because baseboards work best with 180 F water, and most geothermal systems will output 140 F water.  But what if the geothermal is just a pre-heater, then another water heater could be used to bump the temperature up to the required baseboard heat.  This has the hitch of needing two systems to get the water up to temp if my thinking is correct.  Additionally would we be able to use that water heater as a dual purpose; for the residential water and the heating.  Maybe we just need a geothermal system with a heating loop and a residential loop in the heat exchanger?

Yes, a lot of this is rambling, trying to at least get ideas onto 'paper' as it were.  But I wouldn't mind some outside input either, to know if anyone has even heard of doing this and the possible logistical difficulties with any of these plans.  A lot of people push you towards forced air because you get 'free' cooling, but we plan on essentially passive cooling by designing our roof to block the sun in summer and planting the appropriate trees to increase that level of blocking.

So again, still mostly in the planning phase for this but trying to come up with a realistic solution is quite varied and they all have pros and cons.

Sunday, October 21, 2012

Preliminary Site Planning

My dad (whom I introduced you to in one of my first posts), being retired and all, is fortunate to have a lot of time to think about Futurehome. Because of this he has taken on somewhat of a project manager role. To that end, he stopped by the town hall a while ago to pick up some information on forms and permits that we will eventually have to complete, to help us get a sense of what to expect. From this it became clear that one of our first tasks will be to hire a surveyor to come out, analyze the land, and develop a site plan. Well, we figured we could help this along by doing a little site planning of our own, using what we know about general well and leach field requirements and our initial house design. Then, it should hopefully be a quick and painless process to have the surveyor come out.

Conveniently enough, there is a USGS benchmark on the property:
Whoever does the mowing along the road apparently is unaware of the fine
or imprisonment associated with disturbing benchmarks.
Unfortunately, it is a little mangled. Nonetheless, we used this as a control point with our little handheld GPS. First we measured the two nearest utility poles relative to the BM, as well as the distance to the current driveway.

We were originally estimating that Futurehome should be about 300' north of the BM, so we trudged into the field due north. However, this actually put us into a totally different part of the land than we were expecting, and we were a ways down the hill that we were planning to be on the crest of. It turns out that none of our visual cues from the ground were straight or lined up latitudinal or longitudinally - the road, the tree edge, the hill, nothing. So it was a good thing we were using a GPS for a guide. It was surprising to realize how disorienting the whole area was. Using a compass we headed due east to the crest of the hill for what turned out to be ~150', and marked that point on our GPS and in the ground with a stake as the south west corner of Futurehome.

From there we used a tape measure to go 32' north and mark the NW corner; then 64' east to mark the NE corner; and then 32' south again to mark the SE corner. From the NE corner we paced about 30' east and 20' north for an approximate well location. Now with an idea of where the house will most likely go, we had a chance to look around and get a feel for it all. We took a bunch of pictures all around us and used Photosynth to generate a 360º panorama of the current view. A keen eye will be able to spot my dad hidden in among the gone-to-seed goldenrod, and an even keener eye will be able to spot the car we used to drive in. Obviously the vegetation is quite tall, so we will probably go in with a tractor mower soon to clear away at least the house footprint.

The existing driveway ended up being mostly straight ahead but with a couple trees in the way, which blocks the view of the house from the road (all good things, in our opinion). The house is practically smack-dab in the middle of the field, with the woods and valley not too far behind. And as you can see from the Photsynth, there is not a neighbor in sight.
The current "driveway"...kinda
Using a level set to a measured angle, we were able to estimate where the sun will cross the sky in the winter and summer months, and confirmed that the house is far enough away from the tree line to get full southward facing sun year-round. All things seemed to be coming together quite nicely, so we decided we were very happy with the site we staked out.

The view exiting our property at the planned driveway location. I really hope
construction equipment can fit through here without having to take out trees,
because this is a beautiful sight.
Using our waypoints and measurements, we drew up a nice little preliminary site plan:
(I'm keeping all exact locations private for now,
hence the smudges.)

Hopefully we will be able to use all of this to smoothly get an official site plan drawn up, and then we can really get the ball rolling on things like making a driveway, drilling a well, etc. Either way, this was a very exciting visit to the site of Futurehome.

Saturday, October 20, 2012

Some initial design ideas

In a previous post I outlined some of the general plans we are considering with regards to house design. As previously stated, we are looking at a simple rectangular shape. This is advantageous both from a materials standpoint as well as a construction standpoint, as waste should be minimized and construction ease maximized. From a usage standpoint, this approach eliminates any blocked views, and any given window will have a minimum 180º field of view.

Following this shape, the best living spaces would be at the 4 corners, where you can get two perpendicular walls' worth of windows (and therefore ample sunlight, cross breezes, etc.). The middle of the house can then be used for the kinds of spaces that are more utilitarian and/or less dependent on windows and scenery: garage, utility room, kitchen, bathrooms. (We are not "kitchen entertainers" and do not care to make the kitchen part of our living space; though we probably will have space for an eat-in kitchen.)

From these concepts we have been sketching out some rudimentary house plans, just to get some kind of an idea of how this might all come together:


In this example, each square on the grid is 2 feet, and north is straight-up. Here we are considering overall dimensions of 32'x64', giving a total square footage of 2,048.

  • Estimating a garage of about 20' wide by 17' deep, this gives a total living area of 1,708 sq ft. 
  • Across from the garage, in the middle of the house, are the kitchen and the utility room. These are placed strategically based both on the reasoning above as well as ease with which to get groceries to the kitchen and 50-lb bags of salt buttons to the utility room. Also, the dryer (in the utility room) and the range hood can be on opposite sides of one wall and can share the same exhaust.
  • With this placement, the rest of the house is essentially divided up into east and west "wings": east wing for bedrooms (capitalizing on morning sunlight), and the west wing for living spaces. 
  • The main hallway is currently planned to be 42" wide. While that seems like wasted space at first, we learned the hard way that skimping on hallway width can make life surprisingly difficult, especially if you find yourself maneuvering something like a wheelchair.
  • We plan to have pocket doors or sliding barn doors at either end of the main hallway that can allow for each "wing" to be closed off. This is helpful for purposes of entertaining, heating, or even containing smelly food preparation.
  • There is a full bathroom near the bedrooms, and a half bathroom near the main living area. This placement follows our living patterns but also makes plumbing very convenient, as all sinks, tubs, toilets, etc. are concentrated in the center of the house. The shower and all sinks are also therefore in close proximity to the water tank, so hot water will come on practically instantaneously. 
As you can see, we haven't nailed down any ideas of how to break apart the living spaces into rooms. We have sketched and erased some ideas for walls, but this was mostly to be sure that if we were to break up the east "wing" into 3 bedrooms that the total area would be large enough. Overall we are not sure how we will want it to work out. Part of the beauty of only having one level and truss construction for the roof is that we don't have any interior load-bearing walls. So, we might choose to start living in the house without breaking up the "wings" at all initially, and then see how the spaces work for us and go from there. 

I am not a big fan of "open" floorplans, but I can definitely get behind a "flexible" floorplan - especially because I find it very hard to predict how I will want a space to be until I have had a chance to be in it for a while. Also I like to be able to rearrange furniture, so it would be nice to have rooms that allow for multiple configurations. We can also feel free to adapt the rooms according to our place in life: have a kid, wall off a bedroom; empty nesters, take down walls and reclaim unused space. Since we plan on being in the house for the remainder of our years, this is a pretty attractive approach.

Which isn't to say we couldn't use a little suggestion and inspiration from an architect. Plus there are additional considerations like where to position outlets and light switches. We definitely need to get on the ball finding an architect so that we can benefit from some professional experience, advice, and knowledge of building codes.

Tuesday, September 25, 2012

Questioning the Status Quo

We already have some overreaching house plans in mind which would obviously have major implications on what other decisions we make. After visiting the Greentopia EcoFest and doing other research, we have a better idea for some of the basic specifications we plan to employ (with a short explanation of our reasoning):
  • 30-35º roof pitch on a true-south facing roof (to maximize solar panel efficiency; numbers are specific to our region)
  • Raised seam steel roofing (allows for solar panel attachment without any drilling or nailing; requires practically no maintenance)
  • Single level floorplan, no attic or basement (keeps costs way down, uses fewer materials; maximizes space; more efficient for heating)
  • Radiant heating (uses less energy; maintains more constant/consistent temperature)
  • Basic rectangular shape (no unnecessary corners which create more work, more places to seal/insulate, etc.; full 180º-270º views from all sides/corners with no blocking)
  • 8' ceilings, no cathedral or vaulted ceilings (height of drywall, so allows for efficient material usage; no wasted space, more efficient for heating; though, may want to also investigate other heights since other dimensions are available)
  • Trusses to support the roof (sturdy, allows for next bullet point)
  • ~4ft overhang of roof on N/S sides (will block summer sun but allow winter sun angle; blocks rain, may not even need gutters)
  • <2,000 sq ft (we really have no need for anything more than that... even that much seems rather extravagant for us)
  • Lots of insulation and sealing (obvious reasons; insulation material undecided as of yet)
  • And then all the obvious things you can get energy efficient upgrades on - triple pane windows, front loading washer/dryer, energy star refrigerator, low flush toilet, low flow shower head, CFL/LED lighting, etc. (again, obvious reasons)

You might notice that some of the things described above sound a little bit goofy, or at least unconventional. Through our research and brainstorming we have had to do quite a lot of questioning the norm. If you had asked us a few months ago what we wanted, our answers probably would have been quite different: 2 floors, attic and basement, 2 or 2.5 baths, so on. But along the process we have been forced to reassess what is really necessary and what really makes sense. Do we really need an attic and basement, or is that just what we're used to? What is the real motivation behind 2 floors, and is building up really necessary when you have basically limitless surface area to spread out over? How much does the house really matter in comparison to the "estate" as a whole? Our adventure is growing from your basic building-a-dream-home to a full on experiment (which we see as a good thing).

This list is by no means comprehensive, nor is any of it set in stone. This is basically an overview of many of the ideas we have come up with that seem to maximize efficiency, solve problems, and follow logic. Many of these ideas will probably get their own blog posts with more detailed explanations of how we came up with them. Any feedback, suggestions, ideas, or constructive criticisms you may have now or along the way are most certainly welcome in the comments - after all, we are still just feeling this out ourselves. Not all of our ideas are necessarily good ones.

The little icon for this blog is actually drawn to scale according to ideas described above,
including a 33.7º roof pitch, 4' overhang, and 8' ceilings.